Antique Music Rosette Ornament Tutorial!
Today I made these decorative rosettes! They're ornaments. They are fairly easy to make and super charming. Here's how I did it...
 I picked up some scrapbooking embellishments at Joann's. Michael's also carries this brand, K & Co.
 And grabbed one of the old music books I buy on eBay all the time for $1 or so.
 Tore out some pages. {No, I don't feel bad doing this at all. It's not worth anything and no one is going to sit down and play music from the 50s. I'm giving it new life!}
 Trimmed each page down to a 4" x 8" piece.
 Like so. {Don't mind my weathered self-healing mat. It's been with me through a million & one craft projects. Christmas gift hint?}
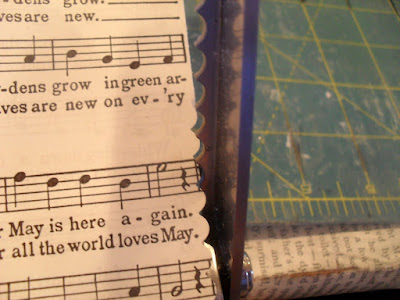
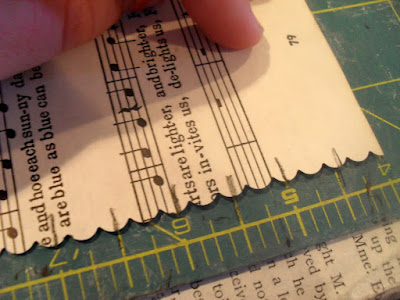
 Totally optional, but I like the effect of scalloping the 8" edges. Zig zag shears work really well, too.
 With a pencil, on one side only, I marked each 1/2 inch.
 Use those marks as your guide to fold every 1/2 inch, accordion style. You don't want to use paper that is too old, I have some from the 1850s and it just fell apart when I folded it.
 When you're done folding, your ends should both be folded in the same direction. The side they end on will be the back of the rosette.
 Now, crease it in the middle by folding the strip in half both ways.
 Should look like this. Now, it's time to glues the sides together.
 Be gentle and take care not to rip the paper. I use Mod Podge to adhere the sides because, well, I use Mod Podge for pretty much everything... and pinch it together with mini-binder clips for 5-10 minutes, or longer if you want.
 Not too hard, right?
 Now is the fun part, decorating the rosette. Get creative. I simply glued on the embellishments. They are adhesive already, but I wanted a super strong hold so I used a little hot glue to get them to really stick.
 Another option I love is to punch out scalloped circles from glitter paper.
 And attach small embellishments to it...
 and then attach that to your rosette! I love the sparkle!
 These are so much fun to make, you can do them a million different ways.
 Now you can add a bow with your ribbon hang by punching some small holes through your rosette and stringing ribbon through and securing it in front with a bow. But this is riskier and you're more likely to tear, so...
 There's also this option, tie a knot to make a ribbon loop and simply hot glue it to the back.
 They will look lovely on a Christmas tree but also just around the house, adding pretty to your decor.
 OR attach one to each Christmas present to your friends & family! It would look lovely on a gift and they can also take it home and treasure it themselves.
 I made 10 in a jiffy... now I'm off to make more...
 Cheers!
 I picked up some scrapbooking embellishments at Joann's. Michael's also carries this brand, K & Co.
 And grabbed one of the old music books I buy on eBay all the time for $1 or so.
 Tore out some pages. {No, I don't feel bad doing this at all. It's not worth anything and no one is going to sit down and play music from the 50s. I'm giving it new life!}
 Trimmed each page down to a 4" x 8" piece.
 Like so. {Don't mind my weathered self-healing mat. It's been with me through a million & one craft projects. Christmas gift hint?}
 Totally optional, but I like the effect of scalloping the 8" edges. Zig zag shears work really well, too.
 With a pencil, on one side only, I marked each 1/2 inch.
 Use those marks as your guide to fold every 1/2 inch, accordion style. You don't want to use paper that is too old, I have some from the 1850s and it just fell apart when I folded it.
 When you're done folding, your ends should both be folded in the same direction. The side they end on will be the back of the rosette.
 Now, crease it in the middle by folding the strip in half both ways.
 Should look like this. Now, it's time to glues the sides together.
 Be gentle and take care not to rip the paper. I use Mod Podge to adhere the sides because, well, I use Mod Podge for pretty much everything... and pinch it together with mini-binder clips for 5-10 minutes, or longer if you want.
 Not too hard, right?
 Now is the fun part, decorating the rosette. Get creative. I simply glued on the embellishments. They are adhesive already, but I wanted a super strong hold so I used a little hot glue to get them to really stick.
 Another option I love is to punch out scalloped circles from glitter paper.
 And attach small embellishments to it...
 and then attach that to your rosette! I love the sparkle!
 These are so much fun to make, you can do them a million different ways.
 Now you can add a bow with your ribbon hang by punching some small holes through your rosette and stringing ribbon through and securing it in front with a bow. But this is riskier and you're more likely to tear, so...
 There's also this option, tie a knot to make a ribbon loop and simply hot glue it to the back.
 They will look lovely on a Christmas tree but also just around the house, adding pretty to your decor.
 OR attach one to each Christmas present to your friends & family! It would look lovely on a gift and they can also take it home and treasure it themselves.
 I made 10 in a jiffy... now I'm off to make more...
 Cheers!


23 *´¯`* ℓσvεℓү cσммεηтs *´¯`*
Another fantastic project! Where do you get so many great ideas?
ReplyDeleteCan't wait to make these!
adorable as always! this would be a great project for girls' groups, like brownies! xo kitty
ReplyDeletethese would make AMAZING gift tags.
ReplyDeleteGood job. Just may have to steal your idea. Hope you don't mind
Found this idea through One Pretty Thing. I am a church choir director and I think these will be perfect gifts for my little choir. Thanks! :)
ReplyDeleteI LOVE these! They would be perfect on my Christmas Tree! The music sheets give it such a vintage look. Thanks for sharing!
ReplyDeleteWow. These look terrific. Thank you for sharing.
ReplyDeleteThese look wonderful and your directions make them seem so simple. Thank you so much for sharing!
ReplyDeleteCute idea!
ReplyDeleteI am scrolling down through every blog listed on Kandyland and yours is where I am tonight...I know, I must be crazy, but I thought it would be like having a new magazine to look at each night. I LOVE, LOVE, LOVE your little ornaments! I have an old song book, I am going to make myself some ornaments to put on my newly purchased old bottle brush tree! Thanks so much! I expect to visit your blog again! ~~Sheri
ReplyDeleteThose look great! Thanks for sharing the steps!!
ReplyDeleteThese are just adorable!
ReplyDeleteYou should stop by my blog, I've used your tutorial to do my tags, and I did link your tutorial so if anyone wants to know. I do love your blog, thanks for sharing!
ReplyDeleteThese are SO cute! Thanks so much for sharing how to make them!
ReplyDeleteLove the ornaments you made using scrapbooking embellishments! Really great idea! :)
ReplyDeleteJenn
I am writing to request permission to reprint this adorable project on OldFashionedLiving.com. We would of course give you full credit and will happily link back to your blog. Please let me know if this is acceptable. Thanks!
ReplyDeleteAmanda Formaro
Chief Editor - Craftown.com
http://craftown.com
Old Fashioned Living
http://oldfashionedliving.com
Hi Amanda, please feel free to reprint - as long as you give credit that's fine!
ReplyDeleteThanks so much!
Cheers,
Heather
Beautiful ornaments, Heather. What glitter paper did you use to punch the scalloped circles with? I have some of the American Crafts glitter paper which I know won't work because it's so hard to cut even with the Cricut. I'm actually looking to find a brand that's not so thick but nice & glittery. I can never get enough bling!
ReplyDeleteLove this crafting ornament, we are going to try this at our next ladies crafting gathering at our church!!
ReplyDeleteThanks for the tutorial :)
Your ornaments are lovely, however your comment that no one is going to sit down and play music from the 50's is ignorantly blase`. It makes me wonder what you may have misused from the 1850's. It's great to be crafty, and greater to be crafty, thoughtful, and respectful.
ReplyDeleteReally like this project! I had to laugh about the comment about the self healing mat! Reminds me of mine!
ReplyDeleteJust adorable. Great gift or gift topper for a music teacher! Insteads of buying embellishments for the center, suggest recycling old Christmas cards. Just cut out in any shape, add a little glitter around the edges and viola!
ReplyDeleteGreat way to use all the old music books I have. These ornaments are pretty and look like fun to make.Thank you.
ReplyDeleteThis looks fabulous! I'm going to make these for my small church choir and choir director for next year. Thanks for sharing!
ReplyDeleteLark & Lola love hearing from you!