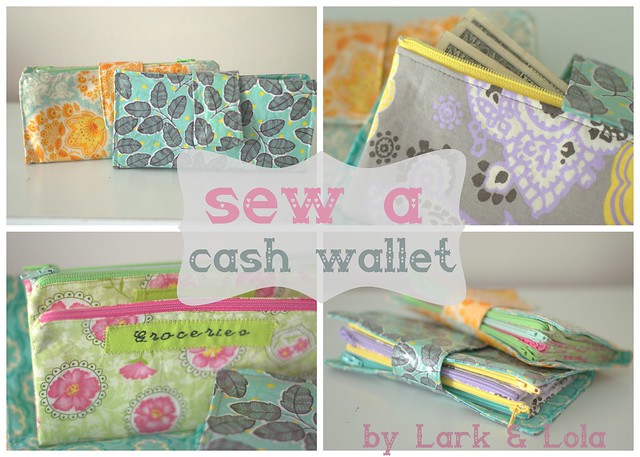
Sew a cash envelope wallet!
When my husband and I started reading the Dave Ramsey books we became very excited to start using the cash envelope system which Mr. Ramsey is so famous for promoting. While Dave's books are chock full of financial wisdom, his system is like dieting: it's hard...but OH SO GOOD for you!
It's taken us several months to really get the hang of living on a cash envelope budget (and we're still learning), it's a great plan and I can recommend it enough. One thing I learned early on was that having separate envelopes floating around did not work for us. Say I'd be out and would unexpectedly find an outfit I wanted to buy for my daughter, but if I didn't have the clothing envelope with me, I'd take money from, say, the eating out budget. It got too hard to keep track of everything! I knew it was only a matter of time before entire envelopes went missing. So I quickly learned that we needed to keep our cash envelopes all in one place so as to not dip into envelopes we shouldn't be, or mishandling the money we'd budgeted.
That's how I came up with this cash envelope wallet! You could use it for various things you need to keep organized, but whatever you might want to use it for, I'm here today to show you how to sew one for yourself. I'm trying to be very complete here, with step by step instructions. Feel free to leave questions in the comments section if something doesn't make sense. But really, this project is easier than it looks once you get going...
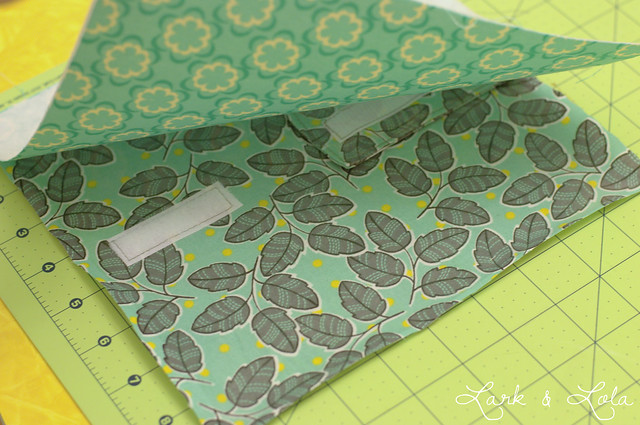
I've made a few of these wallets for 4 or 6 envelopes. You could easily do more if you wanted, make this wallet for your needs. The photos I'm posting show 4 envelopes, but I'll tell you along the way how to do more if that's what you want.
NOTE: you will need to plan for an even number of zippered envelopes! 4, 6, 8, etc. You can't make 5 or 7 pockets with my plans, because you make the zippered pockets in sets of two.
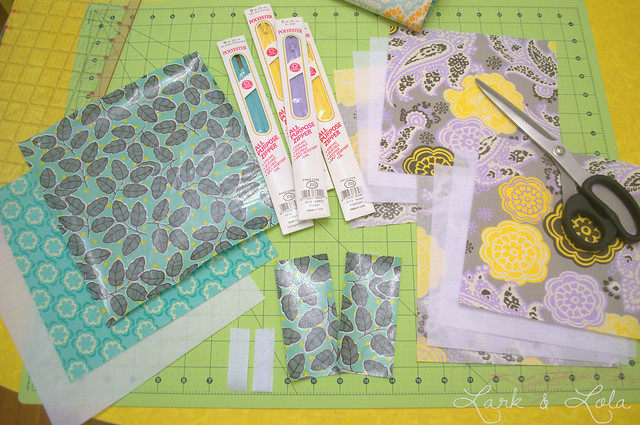
Increase the following supply numbers according to your desired number of envelopes (i.e. if you want 6 zippered envlopes in your wallet, then increase zippers to SIX, fabric pieces to SIX, etc.). For every two envelopes you need:
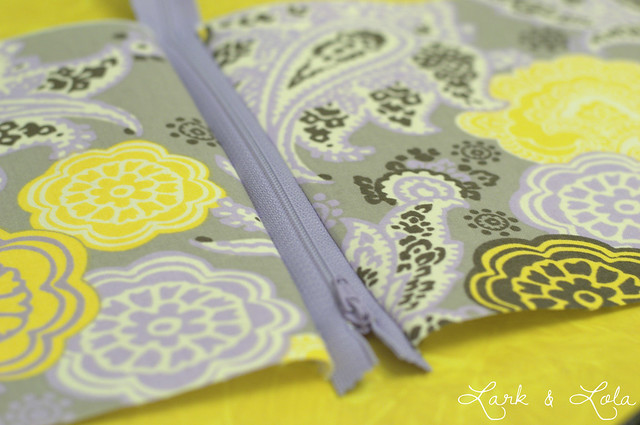
- TWO polyester zippers, 9 inches long
- TWO fabric pieces 8"w x 8.25"h
- TWO pieces medium/lightweight fusible interfacing 8"w x 8.25"h
- ONE fabric piece cut to 9" w x 8.5" h (This will be the outer part of your wallet, I like to use laminated fabric for durability. You can buy iron-on vinyl at any sewing supply store, or use pre-laminated fabric. Regular fabric is okay too if you like!)*
- TWO pieces, matching your outer lining (optional laminated) fabric, 5" x 2"
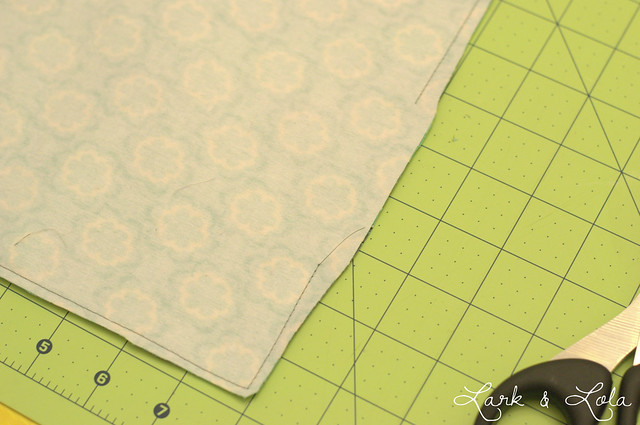
- ONE fabric piece cut to 9" w x 8.5"h, this will be your wallet's inner lining.*
- ONE piece light/medium weight fusible interfacing 9"w x 8.5"h*
- 2 inches of sew-in Velcro fastening, 3/4" wide
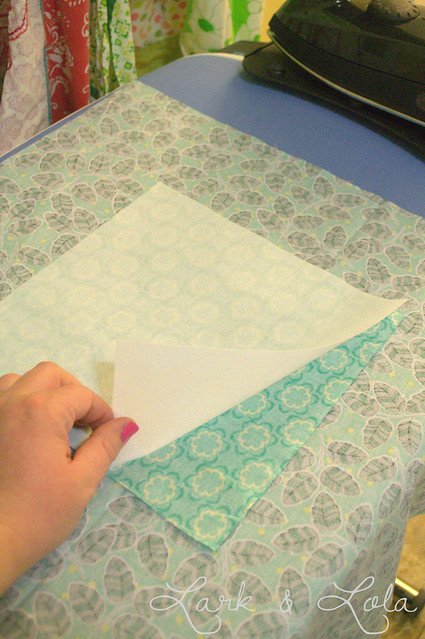
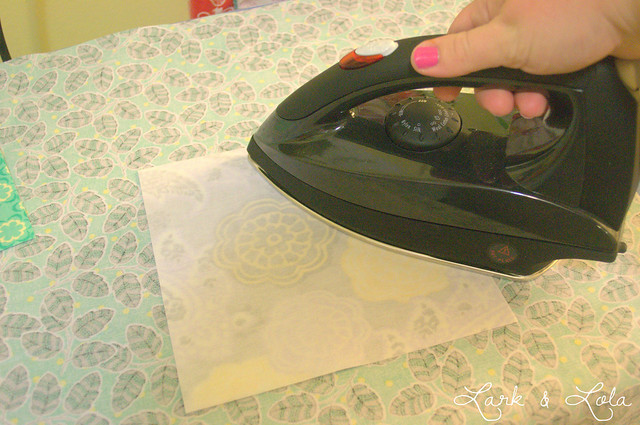
The first thing you'll want to do is to iron on the fusible interfacing to each fabric piece. Each envelope pocket piece will be ironed to interfacing, as well as the wallet shell inner lining. The only fabric that does NOT get lined with interfacing is the wallet shell's outer fabric (the laminated fabric in my case).
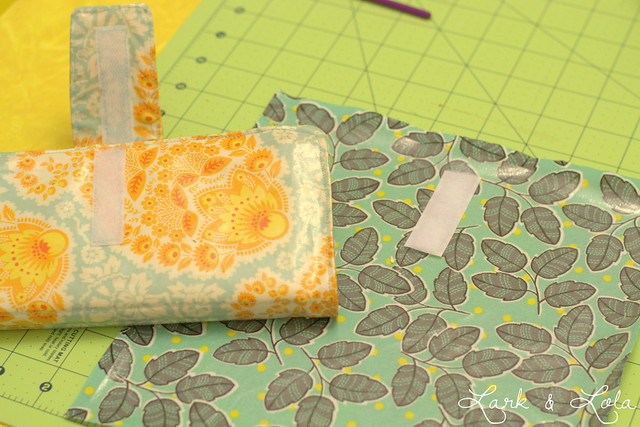
The next step is to sew in your Velcro fasteners. Place the hook side of the Velcro about 1" down from one edge on one of the 5" x 2" pieces, and sew in place like so:
So now you have two pieces of the 5" x 2" outer fabric, one piece that has Velcro sewn on.
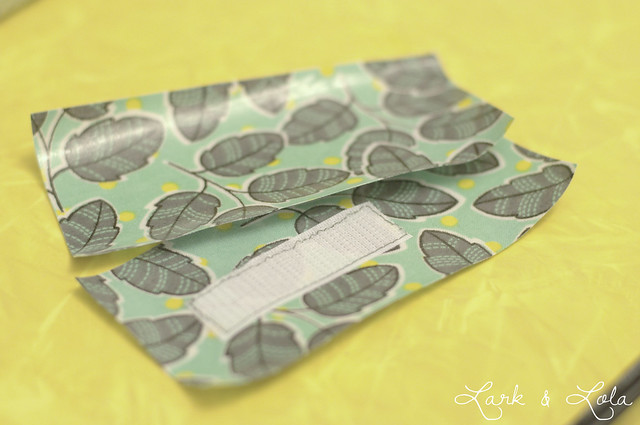
Place your two 5" x 2" pieces right sides together, and sew around the sides and the top closest to the velcro, leaving about 1/8" seam allowance.
Now turn the Velcro tab right side out, I find a crochet hook is helpful. {I loath turning sewing projects out! Worst part of sewing projects if you ask me.}

Finally, top stitch around the edges of your Velcro tab, you shouldn't iron if using vinyl iron-on/laminated fabric!
Now to sew on the fuzzy side of your Velcro fastening....
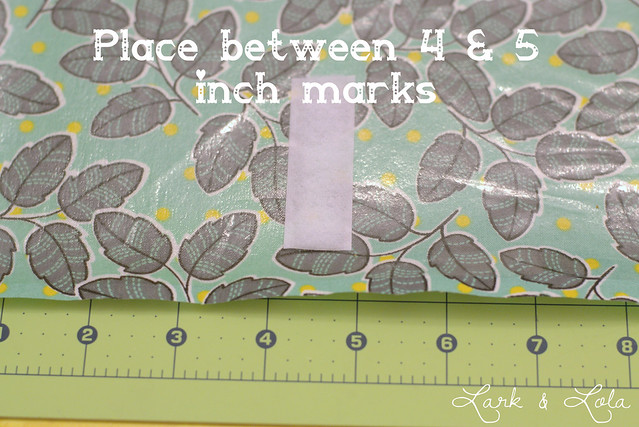
Place your Velcro in the middle of the 8.5" edge of your outer wallet shell fabric, roughly between the 4 & 5 inch marks. Sew in place.
Now to sew together the wallet shell. Remember to include the Velcro tab! It always takes me a moment to work my right-sided brain around these parts. Do NOT sew your wallet shell together with the tab sticking out like this:
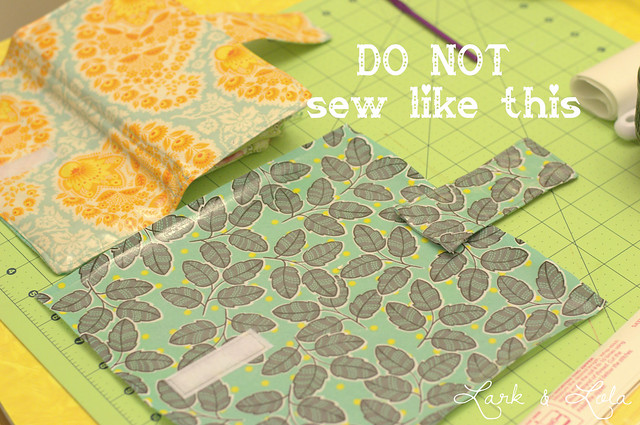
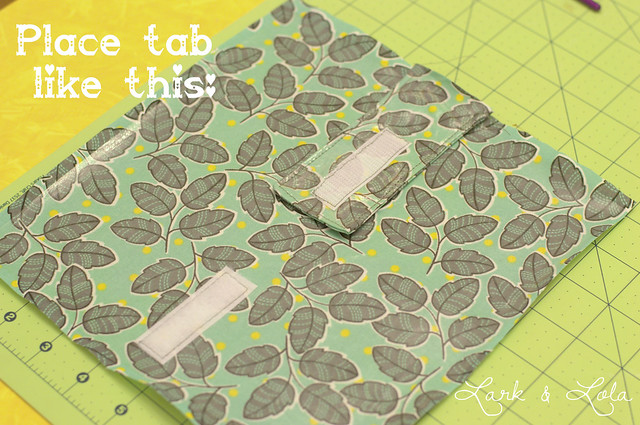
Place the tab, pointing in, on the opposite side of the sewn on Velcro, both will be facing up, like this. THIS is how you want to sew your Velcro tab in:
Place your 9" x 8.5" wallet lining piece on top, face down. I do not pin in place so as not to damage the laminated fabric. Use binder clips if you need to secure these pieces together before sewing.
Sew around the edges, making sure your Velcro tab is sewn into the seam, and leaving about 1/2" seam allowance. Don't forget to leave a hole to turn the wallet shell right side out!
Now you will have a wrinkly shell, but resist the urge to iron, as we usually would at this point in a project, since the fabric is laminated. If you're not using laminated fabric, iron away!
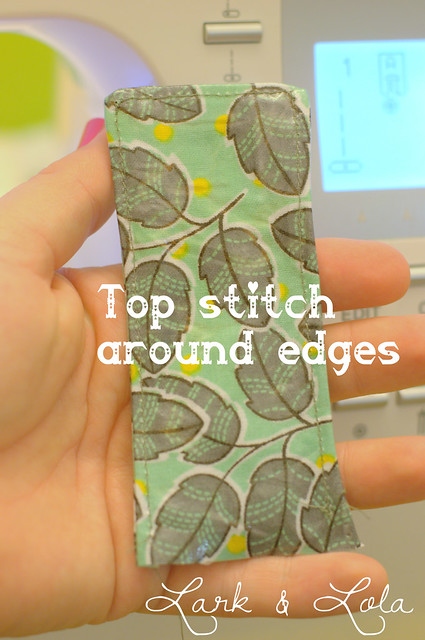
Close up your opening and top stitch close to the edge around the entire wallet shell.
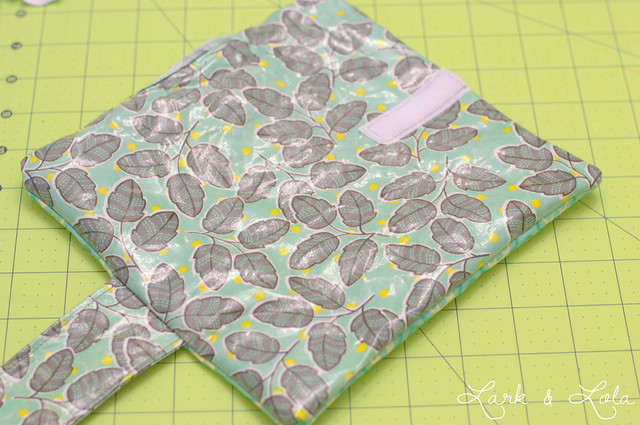
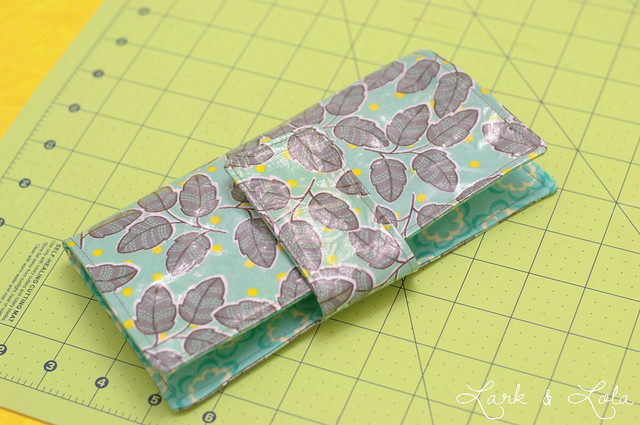
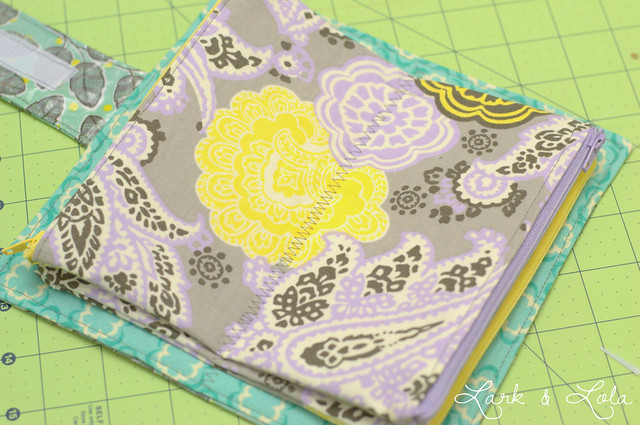
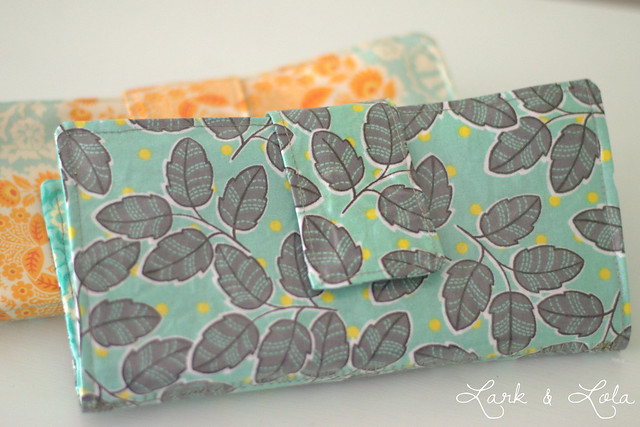
Your finished wallet shell should look like this:
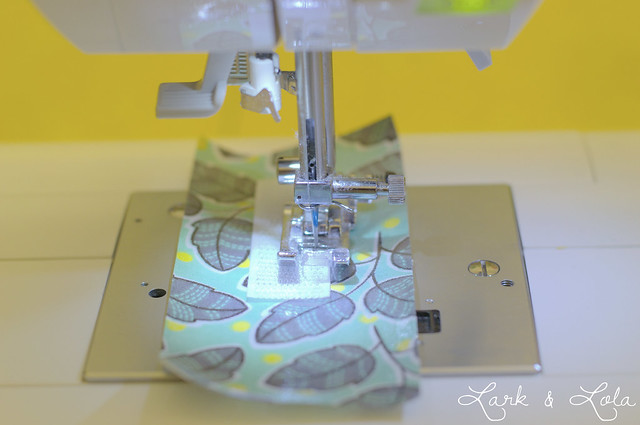
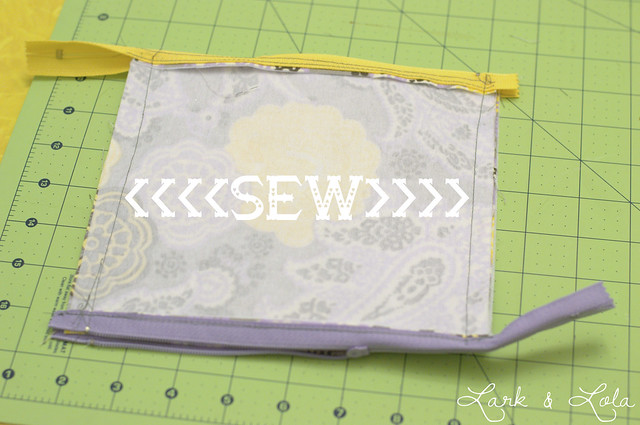
Now to make our envelope pockets. Grab a zipper, place face down on the 8" side of your envelope pocket piece, like this:
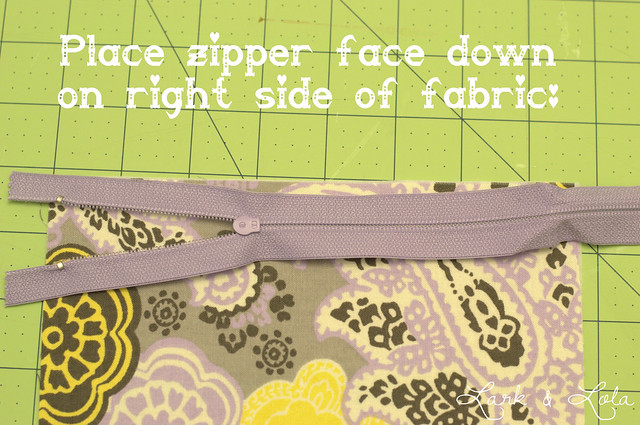
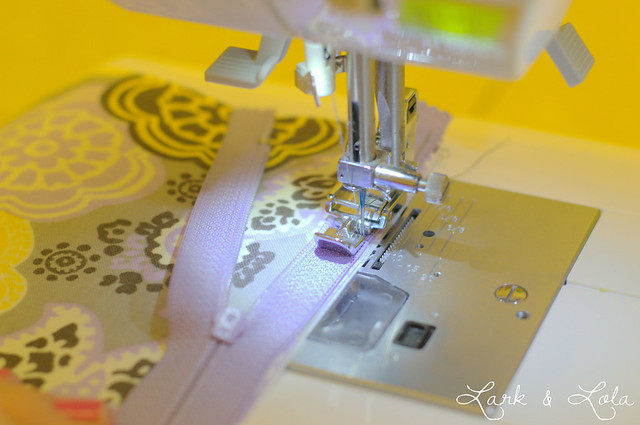
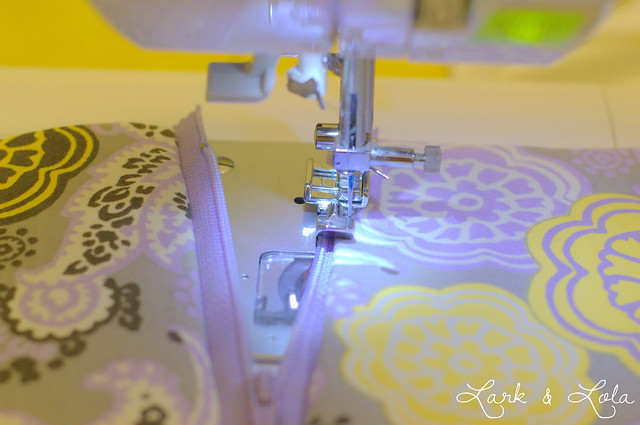
Zippers once intimidated me, but they are actually easier than they look. Using a zipper foot, stitch fabric to zipper's edge. Feel free to open the zipper all the way to make it easier to sew, since the zipper should be at least 9", longer than our fabric piece.
Take the matching piece of your envelope fabric and place face down on the other, un-sewn side of the zipper, like this and sew:
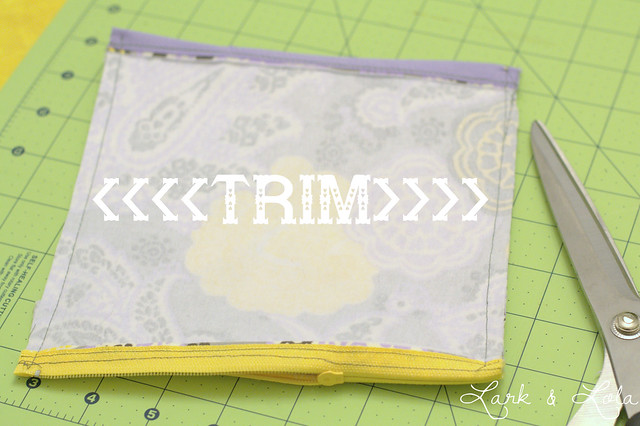
Now you should have a sort of butterfly of two fabric wings, attached by one zipper in the middle:
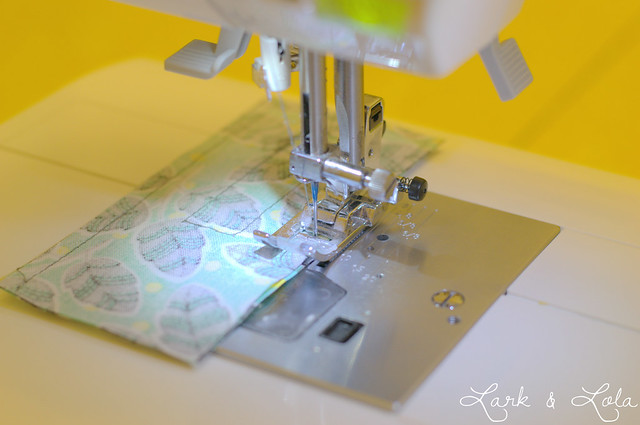
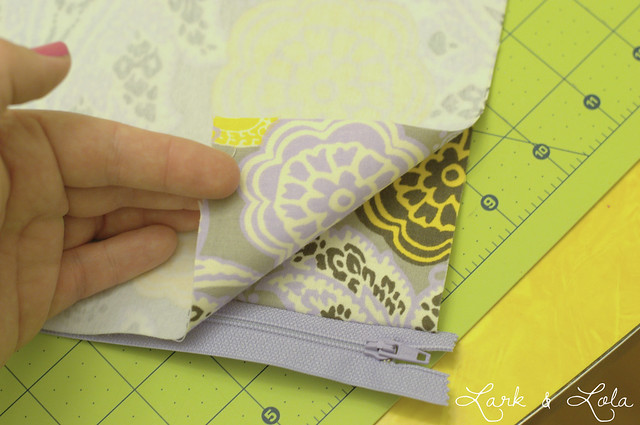
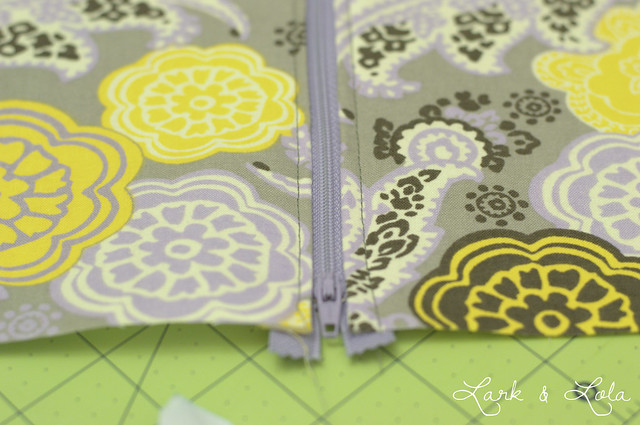
A nice finishing touch to any zipper is to fold your fabric slightly over the zipper edge, and top stitch it down...
So you have a nicely placed zipper with fabric covering most of the zipper fabric:
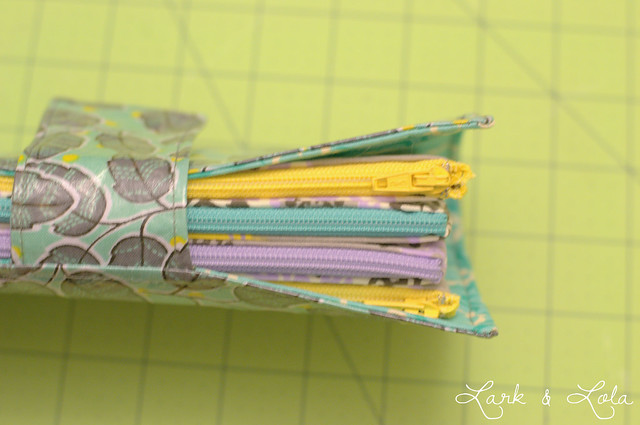
Now, you'll repeat the same thing with a second zipper, on the unfinished sides of the same envelope pieces:
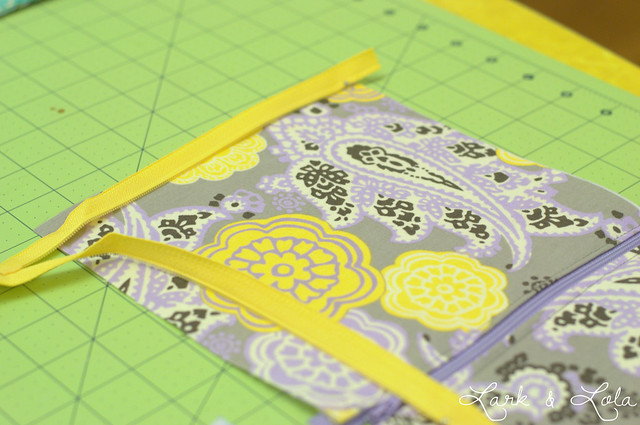
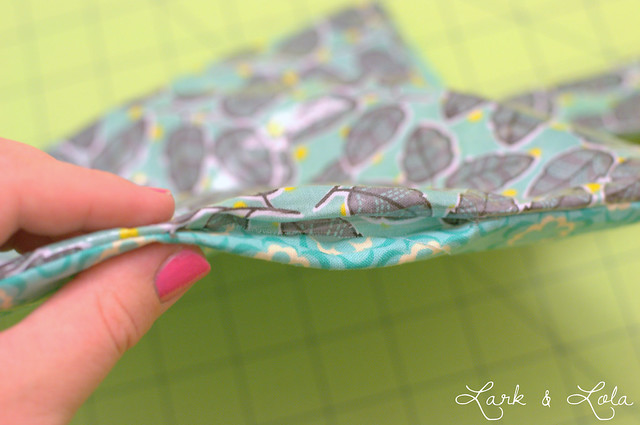
So that you'll end up with a loop of sorts, two pieces of fabric, attached at both ends with two zippers. Now, it is crucial at this point that you leave at least one, or why not both, zippers at least half open! Otherwise, you'll sew yourself out!
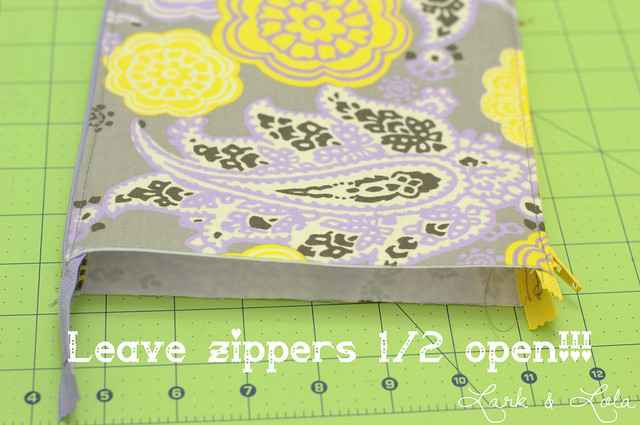
With this loop wrong side out, you'll sew the open edges together, with about 1/2" seam allowance. Yes, you can sew right over those polyester zippers! Just don't hit any of the metal bits.
Then trim off the excess to make it neat and tidy. Yes, again, you can cut right through the polyester zipper to trim off the excess:
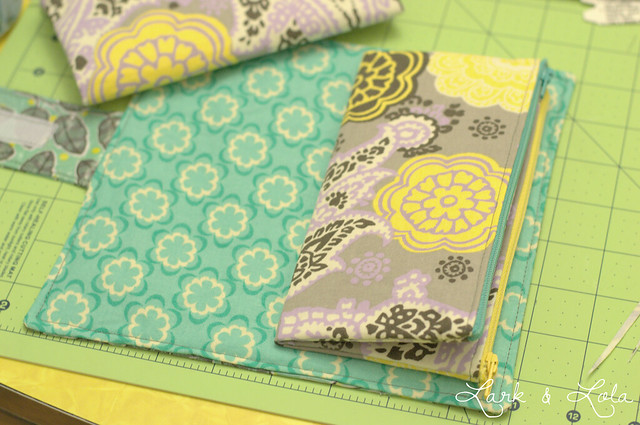
So you see how this makes two envelopes now? When folded in half, you have two zippered pockets.

After making all the zippered pockets, the last step is to stitch them into the wallet shell. Stitching down the center, as you can see, is what makes the large one pocket into two zippered envelopes.
When I did a 6 envelope wallet, I stitched them individually, right up against each other. When I did this 4 envelope wallet, I stitched them all at once with a zig-zag stitch. Just right down the middle. It helps to fold and crease the shell first as a guide to know where the middle is before sewing in your envelope pockets.
One last tip, it really helps with bulk to sew your zippers in different directions, this way not all the bulky zipper pulls end up on one side.
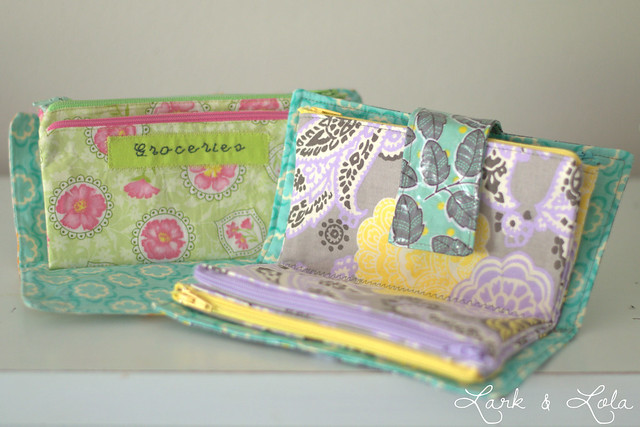
There you have it, finished and ready to be used for sorting cash!
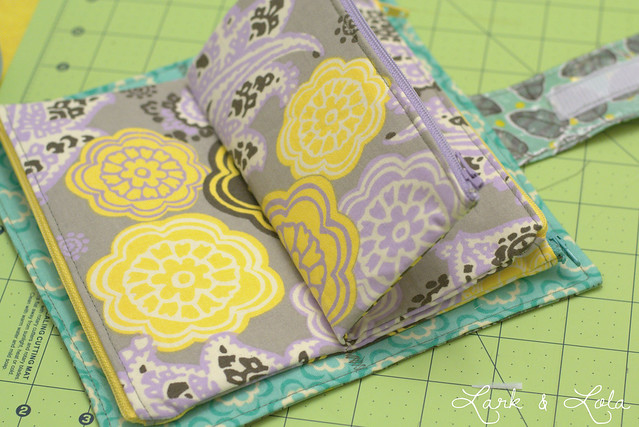
Or receipts...or coupons...or cats...or whatever you might want.
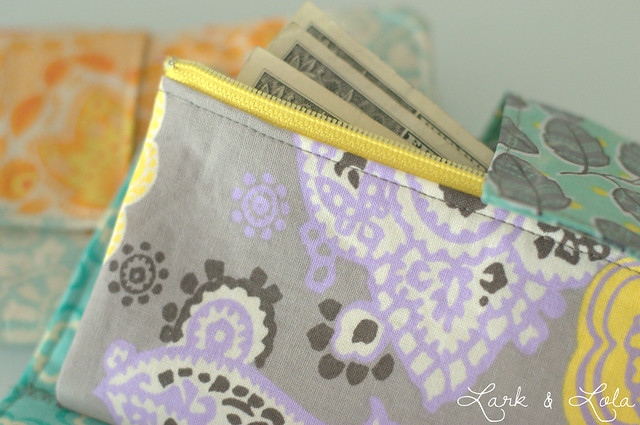
I really love having a special wallet for our cash envelopes. It's made the Dave Ramsey cash envelope method much easier for my family to have all the envelopes in one place!
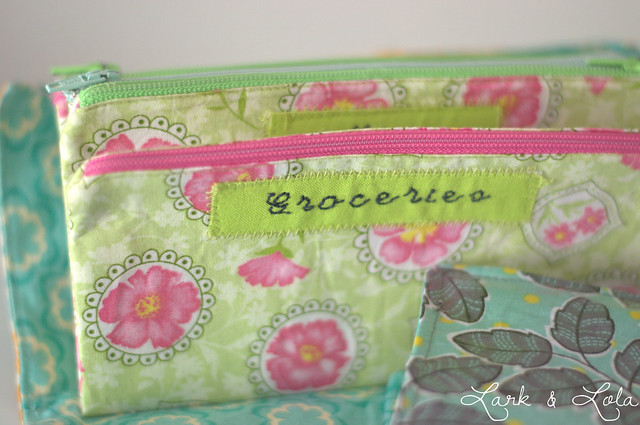
One last optional touch is to add labels to your envelopes. I did this by using the letter stitches on my sewing machine to make the labels and then stitching them onto the envelope pockets. You could also use iron on prints, iron on labels, or fabric marker. It's up to you!
Feel free to leave any questions in the comments section! I'll do my best to answer them. This is a long tutorial but I hope it's clear enough that even a beginner sewer would be able to do this project. Zippers don't scare me anymore, they shouldn't scare you either!
As always, you're welcome to pin and share this tutorial, I just ask that you kindly link back or pin directly from this blog. I'd LOVE to see your own creations if you make your own version of this wallet!
Cheers & Happy Sewing!
Heather


75 *´¯`* ℓσvεℓү cσммεηтs *´¯`*
Can you make me one in chevron? PLEASE?? You and Jan are killing me with your zippers and super cute bags:)
ReplyDeleteHmm...trade you for some tiger cookies in August? ;-)
DeleteHave you never sewn a zipper?
I'm going to forward this to my mom since she is a better sewer than me and she likes that Dave Ramsey dude. It's really cute! The fabrics you used are great!
ReplyDeleteThanks Melissa! ;-)
DeleteI'm not familiar with the "Dave Ramsey dude" but this would really be handy in my pocketbook for stashing receipts and stuff. Really cute.
ReplyDeleteI think there are many uses for this sort of wallet! I've even seen this sort of thing used like an emergency clutch, to hold bandages, hair pins, etc. all organized in your purse.
DeleteThanks for the kind comment Diane!
Oh MY....that cute envelope purse almost makes me want to get BACK on track with Dave's plan. That is the best tut I have ever seen. thank you for sharing.
ReplyDeleteDebra
Wow, thanks Debra! :-) I always worry I don't explain things very well.
DeleteJust shared on Facebook. Would also like to Pin it. I am now going to put it on Flipboard. Need to have my embroidery machine serviced before sewing this. Been several years but I think this may be my first project.
ReplyDeleteI'm not familiar with Flipboard yet! :)
DeleteIf you do this project, let me know how it goes. Thanks for the comment Sandra!
Hi, thanks so much for this post. We have started the envelope system of budgeting and I was looking on Etsy for ideas, however was cringing at the cost of pre-made zippered wallets + with the cost of postage to Australia EEEKKKK!! I bought some zippers from our local thrift shop for .50c each and had some fabric in the cupboard. I made this up last night when the kids went to bed and it looks FANTASTIC. I still have one more double zipper wallet to go and then it will be finished, but just wanted to say your tutorial is fantastic and easy to follow and I had never sewn zippers before and I did it!!! No need to spend nearly $100 on a pre-made one (we couldn't afford that anyway) - cost me $3!!!! Thanks so much Rachael xxx
ReplyDeleteThis is great, thanks so much Rachael!! I try and do very detailed tutorials because I get frustrated when a tutorial confuses me. I'm glad it's been clear enough that some people have actually made this cash wallet :-)
DeleteSo happy, thanks for sharing!
This is wonderful but I don't know how to sew. Would you ever consider making them to sell?
ReplyDeleteI would LOVE to have more time to do my crafts and sell more someday, but I just had baby #3 and don't have the time these days. I would suggest asking any friends you know who might sew or check online at Etsy, lots of people make and sell very similar cash wallets.
DeleteThanks for visiting my blog!
THIS IS AWESOME. I know I COULD just use paper envelopes but pffffft. And all the etsy cash envelopes are expensive IMHO! (And some are butt ugly.)
ReplyDeleteThis will also be my first real sewing project. I might do snaps or more velcro in place of zippers...while I am not sure how to use it!
Thanks for sharing!
That's exactly why I made my own, the ones on Etsy weren't quite my style and they are expensive! Understandably, it wasn't cheap to make either with all the zippers and such, but if you have scrap fabric sitting around it is a lot cheaper to make your own.
DeleteThanks Brista!!
This is a very great tutorial. now i get some ideas on how to make my own cash envelope. Thank you!
ReplyDeleteYou bet, thanks for visiting my blog!
DeleteHi, just thought I'd pop in and say thanks for sharing your easy to follow tutorial, I found your blog today, made myself a wallet, showed it to my sister who loved it so I have just finished making her one as well!
ReplyDeleteThat's awesome! I'm always relieved to hear that my directions were clear and complete enough for others to re-create. So glad--thank you!!
DeleteGreat tutorial - I just finished an 8-envelope wallet and it looks awesome. I ended up not using vinyl lamination for the outside because it was sticky going through the machine and wouldn't feed right. Probably could've been solved with a walking foot. I'm really happy with the plain fabric wallet, though.
ReplyDeleteThanks for all the pictures and details!
I'm so glad it turned out well for you! I think some vinyl must be stickier than others because I've had the same issue in the past with other projects but not on this one.
DeleteThanks Sarah!!
When sewing vinyl or anything sticky, sew with a press-on wrap (adhesive saran wrap sold at supermarkets) on top of the vinyl! Or tape the bottom of your presser foot! Both methods work like a charm!!
DeleteI've always had funny zippers and was curious how you sew the edges of the envelopes. Do you sew from the very outside of one zipper to the outside edge of the other or do you leave a gap before you start sewing? I hope my question makes sense.
ReplyDeleteI'm sorry, I'm not quite sure what you mean? But when I close the sides of the one big envelope that makes two envelopes in the end, I simply sew right over the zippers on both ends. This is assuming they are vinyl zippers. Plastic and metal zippers should not be sewn over. Just a straight stitch along each edge should do it. You could also go right UP to the zippers, I would think that would work okay and only leave a tiny hole since the zipper is stitched in and top stitched lengthwise.
DeleteDoes that answer your question?
This was super helpful! Thank you for the great tutorial.
ReplyDeleteHi Heather,
ReplyDeleteWow! Beautiful wallet and great tutorial. Thank you for taking the time to share. I can't wait to make my own.
Sarah
I feel like a dutz...but I don't sew or own a sowing machine can this be done without it?
ReplyDeleteHello there :)
ReplyDeleteI am so excited to find this tutorial! I'm a beginner sewer and am also just starting the Ramsey plan! One quick question: What do you mean by you individually sew the envelopes together with the 6 envelope system. Everything else is crystal clear and I really appreciate all of the great pics! I'm a visual learner myself ;)
Thanks so much and make it a great one!
Kendra
5th snow day of the new year... I made one of these to get back on track with Dave. Thanks.
ReplyDeleteThank you "sew" much for sharing this tutorial! I really wanted one of these wallets but was having a hard time shelling out $50ish bucks for one right now after just buying FPU home version. I found your tutorial and spent about $15 on supplies (I needed material and zippers). I got the zippers at Walmart (cheapest I could find). I made an 8 envelope wallet. I figure I saved myself $45!!!
ReplyDeleteCan I ask where you got your cute laminated cotton fabric?
ReplyDeleteWould you mind sharing where you bought your cute laminated fabric?
ReplyDeleteHey there! I got my laminated fabric from a local Denver fabric store called Fancy Tiger. If you have a fabric you like but it is not laminated, you can always try iron-on vinyl. I've used this too and it works well. I buy it at Joann's. Your best bet might be your locally owned small fabric store, most of the time they have a selection of laminated fabric and oilcloth. Best of luck to you and your sewing!
DeleteCan you tell me how many yards of each fabric you used? I want to do this with 3 fabrics, but my mommy brain just isn't working tonight. I would like to do 6 envelopes.
ReplyDeleteThanks,
Gennie
Hi! I was wondering if you would like to do trade :)..Here is my shop:
ReplyDeletehttps://www.etsy.com/shop/BetterThanBows?ref=si_shop
Do you think there is a way to line the envelopes? I've made lined zippered pouches but can't wrap my brain around how you would line doubled zippered pouches. Btw: wonderful tutorial. Very well done and equally adorable.
ReplyDeleteAhh!! Thank you for this!! I just spent $5 on etsy for a pdf file to make one of these and 10 mins into reading it I was all confused! I googled a question Abbe your website popped up. I scrapped the other abd well be tossing your super-easy to follow tutorial to make one tomorrow! I got all the supplies today and I'm so excited!! Thank you so much!
ReplyDeleteThank you so much for sharing this (for free!!) We are working the baby steps and I don't see the need to spend $ on a pattern to make one, but how cute are they?!!??. :) I appreciate you sharing this and am so excited to use up some scrap fabric to make this!!
ReplyDeleteCool Iam so.making this however I think im going to.add.credit card/debit.card.holders to.the outside.of the envelopes.not.sure.but may have to.think twice.about.that.
ReplyDeleteWhat size seam did you sew? I am planning to make one for my sister's birthday at the end of the month.
ReplyDeleteWhat size seam did you leave?
ReplyDelete1/4" seams are my usual MO. Thanks for visiting!
ReplyDeleteWhat kind of fabric did you use for your wallet? utility fabric or some simple fabric?
ReplyDeleteWhat kind of Fabric did you use?
ReplyDeleteWas it regular cotton fabric or a specialty fabric?
THANKS!!!!!
Just regular fabric :-)
DeleteThanks so much for the instructions! We just started the Dave Ramsey plan and I need something sturdy like this. Can't wait to make one :)
ReplyDeleteJust finished mine :) Not sure what I did wrong but my envelopes are the same size as the outer shell. Still works and I still like it but I'm stumped! I added 3 card pockets to the inside back and a wrist strap. Thanks for the directions! Sometimes I just don't feel like figuring it out myself!! :)
ReplyDeleteJulie
Thank You So Much For the Awesome Tutorial!! I (like many others) found these wallets online but I could never spend what people are asking for them! I mean come on, I'm wanting one so I can SAVE money! :o) Lol I'm an amateur when it comes to sewing (hate trying to figure out patterns) and I've never sewn a zipper like that before. I was able to make a 6 envelope wallet in no time. I did end up having to scrap my first wallet shell bc it was to short and the envelopes didn't fit in it properly (not sure what happened), so on my second attempt I added an inch to the height (9.5h x 9w) and it turned out perfectly! I added a button to the flap (nonfunctional only for looks) and I also added a pocket (same width as the wallet) to the back inside portion thinking maybe it would be handy for receipts or coupons. Having this wallet is definitely making me more excited to start the money envelope system! Thanks again!
ReplyDeleteJust wanted you to know this is my most repinned pin on Pinterest! I have made one of these and my compliments on a great tutorial. Have a wonderful Christmas :).
ReplyDeleteThank you so much for this tutorial, I love how detailed it is and your photography is so clear and well done. I cant wait to get my hands on some pretty laminated fabric and get making one of these pretty little things :)
ReplyDeleteCheers, Emma from Australia.
this is great!! My husband and I just started Daves plan ;) and I was wondering what we would do about the envelopes because having a huge file folder or loose envelopes floating around would not work they would either get lost in the diaper bag or what not... also i love that I will be able to customize this... thinking it would be fun to make this out of my husbands old ACU Army pants... Id love to figure out a way to make see-through slots for my license and military ID though maybe clear vinyl? im a new "sewer" so this should get interesting but your tutorial was one of the best sewing ones i have come across! i wish i could make my ACU material laminated you don't know of a way to do that do you?
ReplyDeleteI had a question about the interfacing and wanted to know what role it plays in the pockets themselves. I'm a beginner/intermediate sewer and all I could think of was to give the pockets more stability and last longer.
ReplyDeleteI'm planning to make this project out of a nursing cover I have and no longer use (beautiful oriental print) and I wanted to know if the interfacing was optional. Trying to keep this as cost effective as possible to only use things I have in the house or as little cost as possible. I'm really excited to start trying it!
Interfacing in things like these is usually a preference. It would add rigidity to the pockets, but I think you can get away without in for this project. I am about to follow this tutorial myself and don't intend to use interfacing. The only time I ever use interfacing is when I know structural integrity is crucial, for example in a collar on a shirt. I realize your post is quite old, but I'm answering for you or any others who might have the same question <3
DeleteThanks, this was exactly what I was looking for! I, too, am following Dave Ramsey's advice, since I am getting ready to retire and I will not have as much money coming in. So I want to be very careful with my money--starting immediately (a couple of months before I retire). Your instructions were easy to follow and it turned out perfect! I am very grateful for your instructions and the pictures to go with them.
ReplyDeleteThanks for this great tutorial! I just made 2!
ReplyDeleteThis is genuinely an amazing tutorial, all tutorials should be like this. Thank you! Also loving your colour schemes with these ones!
ReplyDeleteHeather, I didn't see a place to put driver's license, debit cards and other IDs. I am going to attempt to make this using some zippered pencil cases I got at the dollar store. Somehow I'll figure out how to incorporate them into the wallet. But i wanted a place to put my license, debit card, my husband's state ID and VA ID (I homecare him) and maybe my checkbook. I guess I could keep my checkbook separate. Any ideas on that??? The zippered pencil cases are 3-1/4 (not counting the zipper) by 8-1/2. I have some material from an outside umbrella (sort of like canvas) in the color red. The pencil cases are wild colors, reds greens yellow blue purple orange. So the red should look good. I appreciate your advice. Thanks for the tutorial.
ReplyDeleteLove this. Two things, could one use a thin cork sheet for the exterior? I've been hunting for a nice wallet to store almost all of my plastic cards (non-id). To help keep things ordered, sort the cards by type and have them stored in its own pocket. Each pocket has enough slots to bold the cards to reduce bulk. If you used different course zippers you'd know each pocket's contents.
ReplyDeleteWhat a great tutorial! Super easy and didn't take long at all. One thing I did differently was to sew down the zipper and little more. So I ended up with a double stitch along the edge of the zipper. It helped keep the money from catching on the zipper when pulling it out. I'm also a top-stitching nut so I top-stitched all the envelopes. Weird, I know. I couldn't find any laminated fabric or iron-on vinyl. Where do you get it? I used duck cloth instead and it seems sturdy enough. Thanks again for sharing!
ReplyDeletePlan to make for college student.
ReplyDeleteAlways seem to run out of money before the end of the semester.
When you sew the zippers on each end of the pockets, how do you top stitch the second zipper? Doesn't the fabric get in the way? I can't figure out how to do this.
ReplyDeleteA sweet friend and I were just talking about the Dave Ramsey budget and cash envelopes! so excited to be able to sew one or more of these up for her!!! It looks like a super tutorial! Thank you!
ReplyDeleteI just wanted to thank you for this super easy to follow tutorial! I made my own 6 pocket cash wallet and added some card slots to the lining!
ReplyDeleteThank You! This will be my weekend project! Thank you!
ReplyDeleteThis is a great idea–I have little girl. They could really go for this. And I can get further along with not feeling intimidated by the design.
ReplyDeleteLove the wallet... May I ask... If I have lining for the pockets, do you think it will be thick for a 6-pocket wallet?
ReplyDeleteIG:sewmulia
fb.com/sewmulia
Do you make these to sell? I NEED this and all of its cuteness and functionality but I have never sewn in my life! Would love to buy one!
ReplyDeleteHi I made a 6 pocket wallet yesterday and your instructions were very easy to follow. Thank you.
ReplyDeleteThank you for the great tutorial. I'm on a Friday tight budget but treated myself to a fat quarter today. This pattern is perfect for those pretty fat quarters and I'm on a cash budget with envelopes so it's perfect.
ReplyDeleteGreat tutorial! Tnx!
ReplyDeleteI didnt think I could do this cash wallet, but I did! I found your tutorial this morning, and once my free 2 hours away from caregiving our blind/disabled grandson was able to be spent today, i found some old zippers and some scraps that went ok together And I finished this amazing tutorial. It wasnt hard with your amazing photos. I feel accomplished today after a rough, rough early morning. Thanks!
ReplyDeleteI didnt think I could do this cash wallet, but I did! I found your tutorial this morning, and once my free 2 hours away from caregiving our blind/disabled grandson was able to be spent today, i found some old zippers and some scraps that went ok together And I finished this amazing tutorial. It wasnt hard with your amazing photos. I feel accomplished today after a rough, rough early morning. Thanks!
ReplyDeleteThank you so much for this fantastic tutorial! I first found and used these instructions 18 months ago to sew the cash wallet for my husband and I to use ... and it has worked out (and held up) beautifully! I went with 8 pockets and labeled them by punching little index tabs out of heavy-duty cardstock and stapling them through the back panel of each envelope. Now I'm sewing one for my stepdaughter to use at college. Thank you so very much for this project!
ReplyDeleteDo you by chance sell these?
ReplyDeleteLark & Lola love hearing from you!