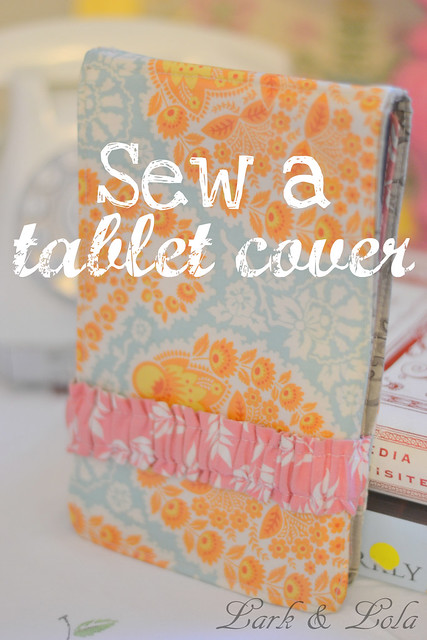
My husband gave me a Kindle Fire for an early Christmas gift this year, and I love it! When I started looking for covers, however, I h...
My husband gave me a Kindle Fire for an early Christmas gift this year, and I love it! When I started looking for covers, however, I had a hard time finding any that I liked even a little bit. I'm very picky about my accessories, and I just couldn't settle for a blah plain one...
So here is my FIRST ever sewing tutorial/pattern that I created all by myself. I won't lie, my first attempt didn't turn out so well, but I learned from my mistakes and now I'm showing you my second try, which turned out a lot nicer. You can easily alter this tutorial for any tablet--so if you don't have a Kindle Fire, you should still be able to pull this off. I'm a very novice seamstress, and my second try went off without a hitch.
You will need:
1 - 17" x 5 3/4" fabric piece for the outside (I used a laminated fabric for mine)
1 - 17" x 5 3/4" fabric piece for the inner lining
2 - 17" x 5 3/4" pieces of thin, but medium stiffness fusible interfacing
1 - 8" x 5 3/4" fabric piece for holding the Kindle in place
1 - 8" x 5 3/4" piece of fusible interfacing
You will also need elastic. I decided to try clear elastic for mine (like the kind used in bras and other delicates), and it seems to have worked out well. You could use regular white or black woven elastic, too, if you feel more comfortable with that.
(Post edit: almost a year later, the clear elastic has held up beautifully!)
And of course the basic sewing supplies: a sewing machine, marking pencil, measuring tape, pins, thread, etc.
If you are not making this for a Kindle Fire, you want to size what would be the 17" x 5 3/4" pieces by measuring 1/2 inch seam allowance on three sides of your tablet. Then at the top you will add about 3/4", the length of your tablet again, and 1/2" at the end. (Or, more simply, 2 times the length of your tablet plus 1 3/4" and 1" wider than your tablet.)
For the Kindle/tablet holding piece, simply cut a piece of fabric that is 1/2" longer and wider on each side of your tablet.
So you will end up with 6 pieces of fabric which will become your Kindle/tablet cover.
Start by fusing each piece to it's matching interfacing.
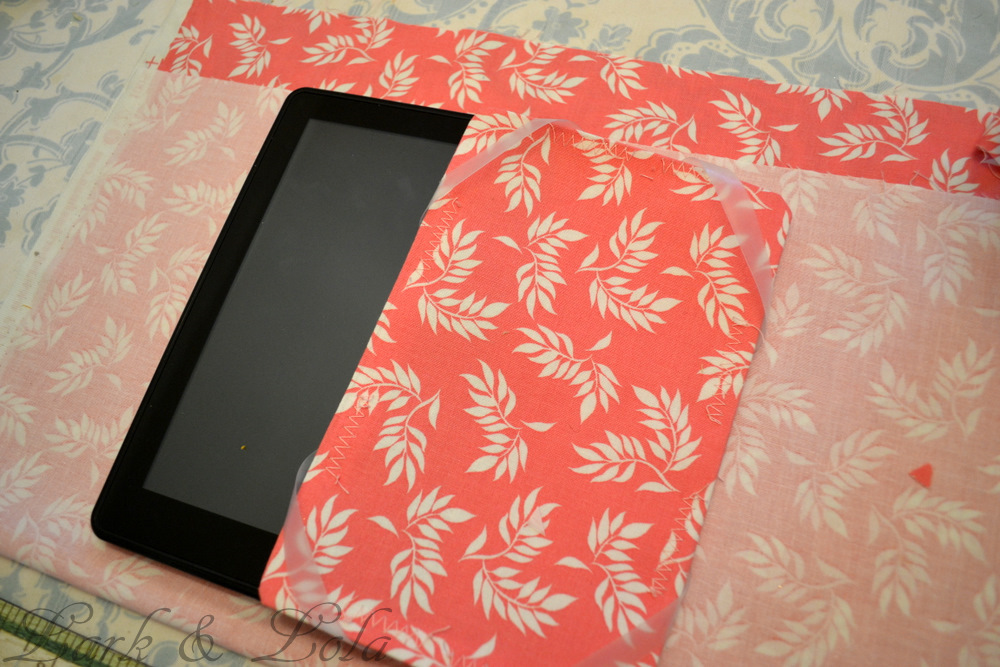
For the 8" x 5 3/4" piece, trace the size of your Kindle to help you press the edges evenly when your turn them in.
I attempted rounded corners for this piece (I'm a novice, don't forget.)
And pressed it like so:
Now you will need to cut four lengths of your elastic, about 5" each. (If you use the clear elastic like I did, be sure to pre-stretch your elastic.)
This is the way in which you want to sew your elastic onto each corner of the Kindle holder, making a loop that will come out on the right side of your fabric.
It's hard to see, but if you look close in the photo above you can see the elastic angling out toward me. Start by sewing on one end, then bring it around the front, leaving just a
little extra slack (as opposed to running it around the corner straight up against your fabric) , and sew the other end onto the other side of your corner, also at an angle.
Do this on all four corners, creating elastic straps that will hold your Kindle in place.
Once you have those in place, pin the Kindle holder piece to your lining fabric, leaving 1/2" on three sides, like so:
Then continue by stitching the Kindle holding piece onto the lining, close to the edge. Be sure to pull your elastic straps to the left so that they are stitched around the edge nicely and you don't lose any slack.
This next little bit is optional, you can simply use an elastic strap if you like, but I wanted a ruffled strap for my Kindle cover, so I took a strip of fabric, about 3" wide and 20" or so long.
Fold the strip in half lengthwise, and sew 1/4" or so along the edge, then turn it right side out:
Flatten your strip, placing the seam in the middle (this will be the backside of the strap.)
Now sew 1/4" seam down each side, creating a tube in the middle.
Run a piece of elastic through the middle tube portion, using a safety pin to guide it through.
Stitch one end of the tube shut, being sure to get the elastic in place. Now figure about how much elastic & ruffle you want your strap to have, don't make it too tight. Snip off any excess of the strap and stitch the other end shut, being sure to catch the elastic in your stitch. The ruffle effect is created by the fabric being longer than the elastic.
Now you're ready to sew it all together. Place the lining and cover pieces right sides together and pin it in place. Remember to tuck your strap (or elastic) inside, don't pin it sticking out and around like I show in this picture! (Sometimes my mind has to work at figuring out how these things come together.) Simply tuck the edges of your strap piece in between and up to the edges, making sure it will be stitched with your seam. I placed by strap across the bottom about 1-2" up from the bottom (on the same end as the Kindle holding piece with the elastic, of course).
Before stitching, take a moment to check your tablet/Kindle to get a good idea of how much seam allowance you should have. If you have a lot of excess, now is the time to trim it down. I wanted my cover to fit my Kindle pretty snug, so I stitched about 1/3" seam all around.
Be sure to leave an opening at the bottom so you can turn your cover right side out!
Turn it right side out. Usually I would press my project at this point, but I don't want to melt my clear elastic so I skipped this step. Instead I just top-stitched around the entire edge, being sure to stitch my turnout hole shut as well.
Another optional bit: Before top-stitching, I used my Kindle to check for the crease, and added pins where the crease started and stopped.
Using the pins as a guide, I marked 3 straight lines down the middle crease, and I stitched along each line. I find this helps the cover fold well.
Like so:
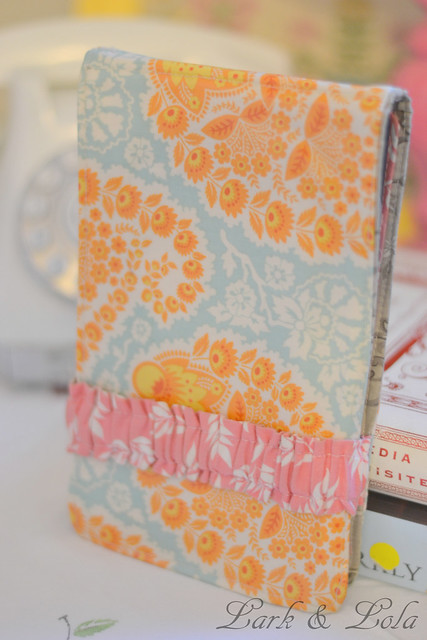
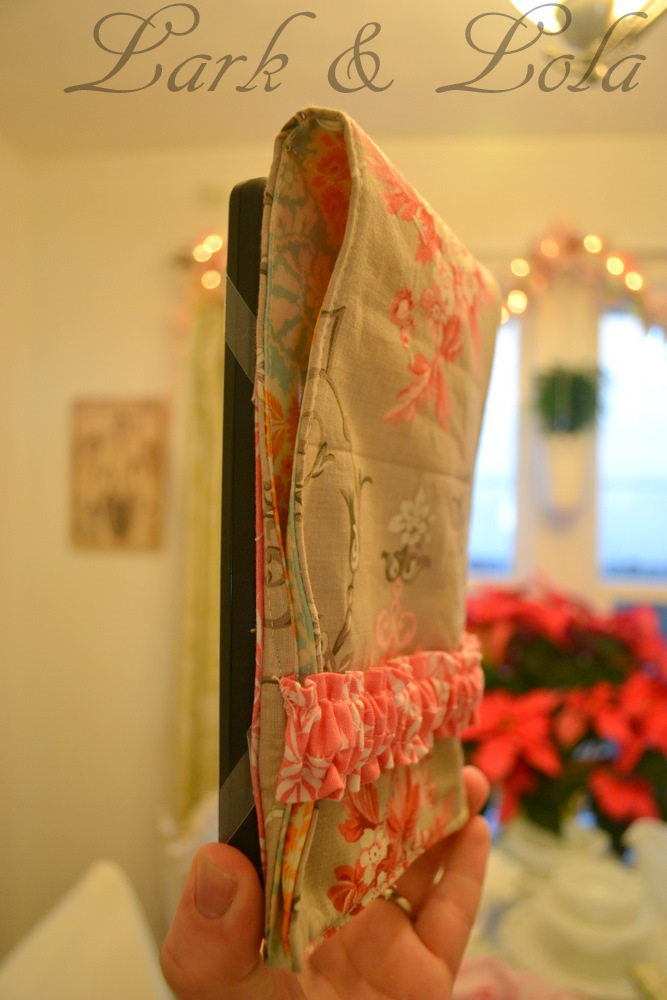
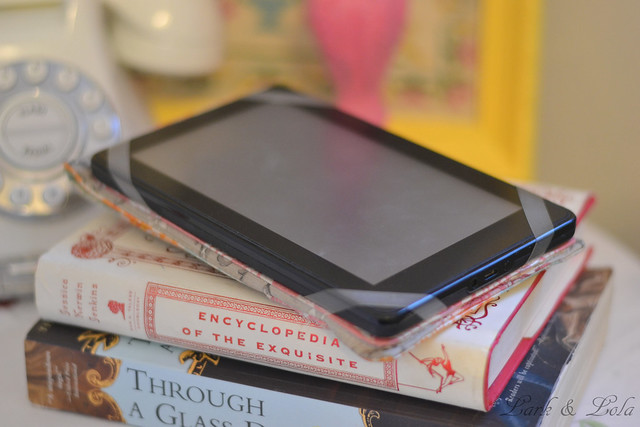
Now it's the moment of truth! Check your Kindle to make sure it fits in your cover nicely. Hopefully it does, just like mine:
I have to say, I'm glad I chose the clear elastic. It seems to hold up pretty well and I find it less distracting to my eye than the 4 white elastic strips would be.
You should now have a pretty little Kindle (or tablet) cover!
I love how well it fits my Kindle, and it's so much more my style than any other Kindle cover I saw for sale.
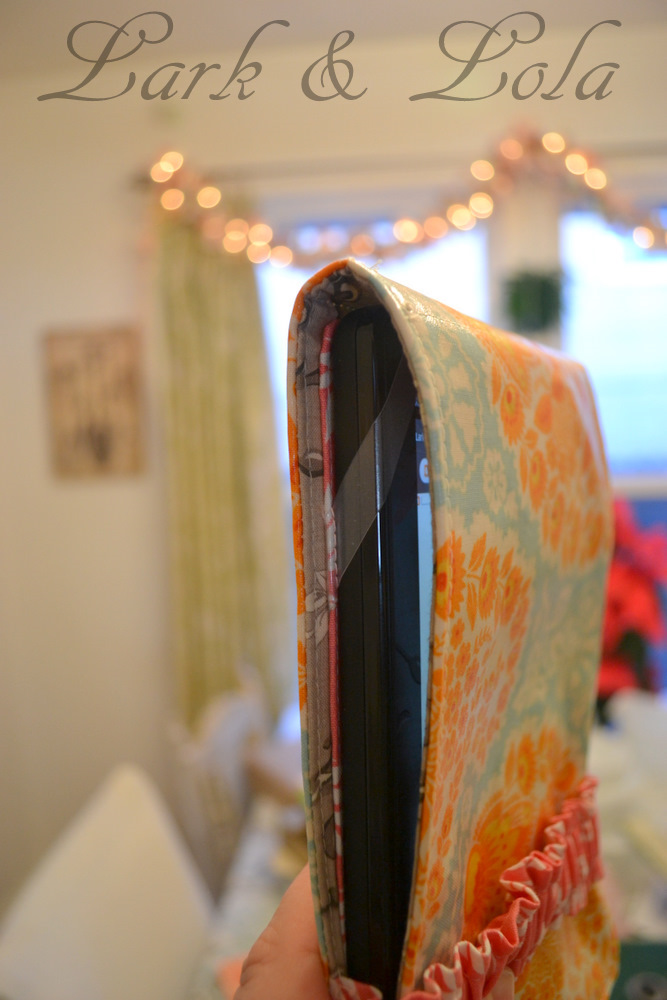
The nice thing about the strap is that I can flip it over to the backside to hold the cover back when I'm using my Kindle.
And it's ruffled. Ruffles are always a plus.
If you decide to use this tutorial to make your own tablet cover, please share pictures when you're done!
Thanks for stopping by and
have a very Merry Christmas!


12 *´¯`* ℓσvεℓү cσммεηтs *´¯`*
Thanks for the Great Tutorial! I will be making one soon as a gift for a friend that just received her 1st Kindle Fire! Again thank you so much!
ReplyDeleteI made this last night. First time I have ever sewn a complete project by myself with out cocking up my machine! Awesome directions and fantastic tutorial. I am making another one, using fusible fleece for the cover, for extra padding. Thanks for the tutorial!!!!
ReplyDeleteThank you for this Tutorial, it is just what I need! I received a Kindle for a Christmas present from my family and need a cover for it.
ReplyDeleteElaine
This was a great tutorial! Great job.
ReplyDeleteHomealamode.blogspot.com
This is brilliant thank you. I also got a kindle (today actually) and have been perusing covers and can't find any i like. Especially as any that look like actual books (my preference) are so so expensive. I came across your blog as I was mulling over how to attach the elastic straps if I make my own with a vintage book and I'm so glad I did. This is great!
ReplyDeleteNew follower!
Dp
X
Www.inanityandthegirl.blogspot.com
Love love it! I just made your cover for my daughter and she LOVES it! I am already starting on one for a friend of mine. Thank you so much for the tutorial!
ReplyDeletethanks for shearing nice blog nice clothing to the thinks
ReplyDeleteEducation
thanks for the tutorial. I made a cover for my granddaughter's tablet.
ReplyDeleteLove love this. I really need a bible cover....could it be done in this fashion......do you know any tutorials for a bible cover!? Love the ruffle/elastic.....Laurie
ReplyDeleteI don't know of any Bible cover tutorials but I bet if you altered this tutorial you could make one pretty easily!
DeleteGood luck & thanks for the comment :)
Some of the cases we look at are truly great and others are awful but most, well, they just don’t stand out. Some provide added features and others do little more than look nice.
ReplyDeleteGreat post, and great website. Thanks for the information! Tablet & iPad Accessories &
ReplyDeleteLark & Lola love hearing from you!